


Table of Content

Transferring your WordPress site is a task that may come your way eventually. Whether you’re considering relocating your WordPress site to a different hosting provider, transitioning from a local setup, or moving from a Multisite installation, the need for migration can arise.
Whether you opt for a manual approach, are with a different hosting provider, or are in the process of migrating between local and remote environments, this guide is designed to assist you in comprehending the steps involved in successfully moving your WordPress site to a new host.
Potential Challenges and Risks Associated with Downtime When Considering WordPress Migration
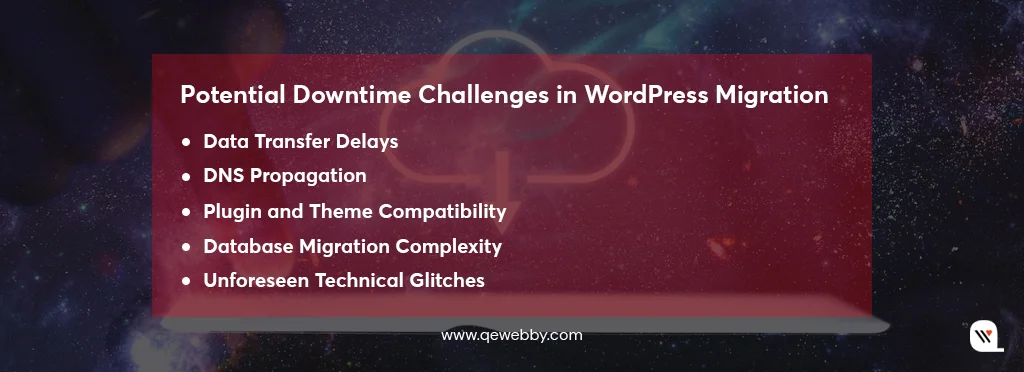
While migrating WordPress, it’s crucial to be aware of potential challenges and risks, especially those related to downtime:
- Data Transfer Delays: The process of moving data from one server to another can be time-consuming, leading to temporary unavailability of your website.
- DNS Propagation: Updating DNS records to point to the new server may introduce a propagation period during which users might experience intermittent access issues.
- Plugin and Theme Compatibility: Differences in server environments may cause compatibility issues with plugins and themes, potentially leading to functionality disruptions.
- Database Migration Complexity: Migrating databases can be intricate, and errors during this process can result in downtime or data corruption.
- Unforeseen Technical Glitches: Despite meticulous planning, unforeseen technical glitches can occur, causing unexpected downtime during the migration process.
Before You Migrate – Strategic Preparations for WordPress Migration
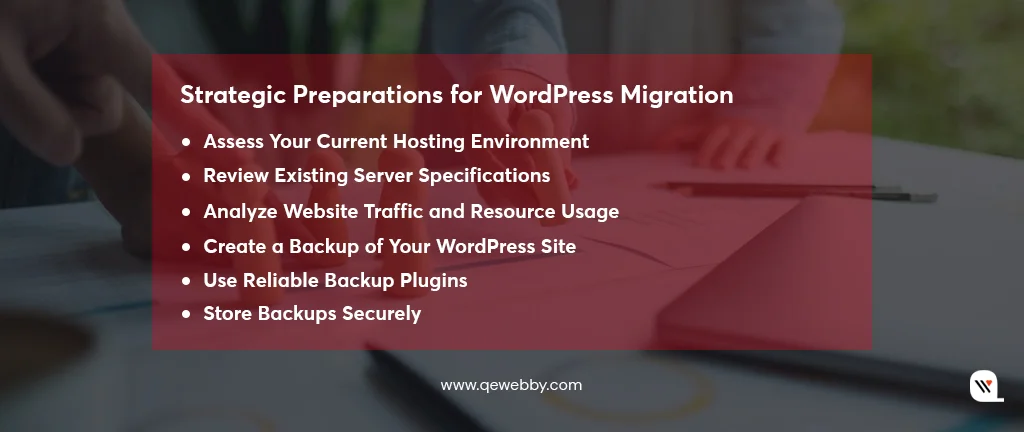
By meticulously evaluating your current environment and fortifying your data assets, you position yourself for a migration characterized by efficiency, reliability, and a steadfast commitment to data security.
Assess Your Current Hosting Environment – Initiate the migration process with a comprehensive evaluation of your existing hosting infrastructure. Delve into the intricacies of server configurations, software stack, and overall performance metrics. This critical assessment forms the foundation for informed decision-making in the upcoming migration steps.
Review Existing Server Specifications – Scrutinize the technical specifications of your current server infrastructure. Examine parameters such as CPU, RAM, storage, and network capabilities. This meticulous review ensures that your chosen new host aligns with or exceeds the performance standards necessary for your WordPress site.
Analyze Website Traffic and Resource Usage – A data-driven approach is key to understanding your website’s dynamics. Conduct an in-depth analysis of traffic patterns and resource utilization. Utilize tools and analytics to gain insights into peak traffic times, resource demands, and potential scalability requirements. This analysis serves as a strategic guide for resource allocation on the new hosting environment.
Create a Backup of Your WordPress Site – Before venturing into migration, create a comprehensive backup of your WordPress site. Employ established backup methodologies, utilizing tools such as UpdraftPlus or BackupBuddy. This precautionary step ensures the preservation of your site’s integrity, offering a fallback option in the event of unforeseen challenges during migration.
Use Reliable Backup Plugins – Select backup plugins with a proven track record in reliability and efficiency. Opt for solutions that facilitate both full and incremental backups. This technical diligence guarantees the consistency and completeness of your backup sets, fostering a secure foundation for the migration process.
Store Backups Securely – Implement secure storage practices for your backups. Utilize encrypted cloud storage or offline repositories to mitigate the risk of data compromise. This security-centric approach safeguards your site’s historical data, ensuring its integrity and confidentiality throughout the migration journey.
Choosing a New Hosting Provider
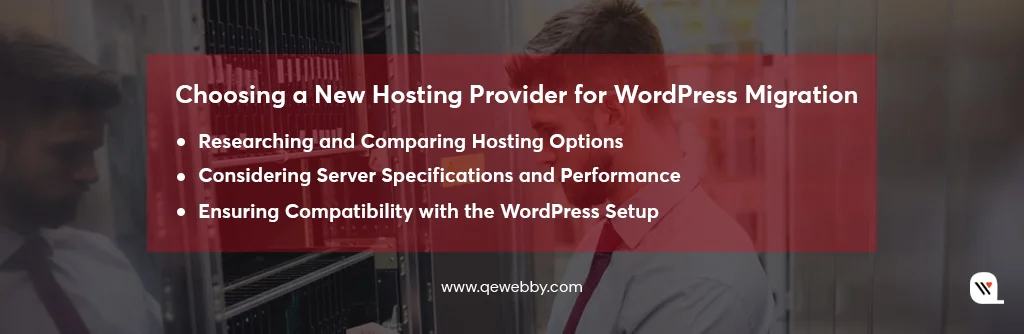
In the pivotal phase of transitioning to a new hosting provider, a meticulous selection process ensures the foundation for a seamless migration. You need to set the stage for a hosting provider that not only aligns with your current WordPress setup but also paves the way for future scalability and optimal performance. Here’s a detailed exploration of the technical aspects involved:
Researching and Comparing Hosting Options
For selecting a hosting provider, it’s imperative to conduct a comprehensive assessment on multiple fronts. Begin by delving into the reputation and reliability of potential hosts, meticulously examining industry reviews and testimonials, while also evaluating historical reliability, uptime records, and adherence to service levels agreements (SLAs). Turn your attention to the critical aspect of customer support, scrutinizing the responsiveness and expertise of support teams, assessing support channels, response times, and overall availability of technical assistance. Simultaneously, gauge the scalability and flexibility of hosting plans, ensuring they feature scalability options to accommodate future growth and provide the flexibility to adjust plans based on dynamic resource requirements. Finally, prioritize the investigation of security measures, exploring the implemented protocols and features such as SSL certificates, firewalls, and malware detection to fortify the security of your WordPress environment.
Considering Server Specifications and Performance
When selecting a host, ensure its hardware aligns with your WordPress performance needs, assess low-latency connectivity, and consider data center locations for optimal content delivery. Understand the virtualization technology used and look for performance features like CDNs and caching for speed and responsiveness in your hosting environment.
Ensuring Compatibility with the WordPress Setup
Ensure your hosting provider supports the necessary PHP version for your WordPress site and is compatible with your chosen database management system, such as MySQL or MariaDB. Investigate potential compatibility issues with WordPress plugins and themes, ensuring a seamless integration with your site’s functionalities. Additionally, confirm support for version control systems like Git for efficient development workflows, and assess the availability of staging environments to test updates and changes before deploying them to the live site.
Setting Up the New Server
In the crucial phase of establishing a new server environment, the technical intricacies of server setup play a pivotal role. Here’s a detailed exploration of the steps involved:
Acquiring the New Hosting Plan
- Carefully select a hosting plan that aligns with your website’s current requirements and future scalability needs.
- Consider factors such as storage capacity, bandwidth limits, and the ability to easily upgrade or customize the plan.
- Choose a data center location that optimizes geographical proximity to your target audience.
- Assess the hosting provider’s global presence to enhance content delivery speed through strategically located data centers.
- Opt for a server operating system that suits your technical preferences and requirements.
- Consider popular choices like Linux distributions (e.g., Ubuntu, CentOS) for their stability and compatibility with WordPress.
Configuring Server Settings for Optimal WordPress Performance
- Adjust web server settings (e.g., Apache or Nginx) to optimize the handling of WordPress requests.
- Fine-tune parameters such as concurrent connections, request timeouts, and keep-alive settings for efficient performance.
- Modify PHP settings to align with the requirements of your WordPress version.
- Adjust memory limits, execution times, and upload file size limits to accommodate the demands of your site and its plugins.
- Configure the database management system (e.g., MySQL or MariaDB) for optimal WordPress performance.
- Set up caching mechanisms, indexing, and database optimization routines to enhance query efficiency.
- Implement security best practices, including firewalls and intrusion detection/prevention systems.
- Configure secure communication protocols (HTTPS) and ensure regular security audits are part of the server setup.
Installing Necessary Server Software and Tools
- Install and configure the chosen web server software (e.g., Apache, Nginx).
- Enable necessary modules and features required for WordPress functionality.
- Install and configure the selected database management system (e.g., MySQL, MariaDB).
- Create and optimize databases to ensure efficient data storage and retrieval.
- Set up the PHP runtime environment with the required extensions and dependencies.
- Ensure compatibility with the specific PHP version recommended for your WordPress version.
- Implement monitoring tools to track server performance, resource utilization, and potential issues.
- Configure logging mechanisms for error tracking, ensuring prompt identification and resolution of any anomalies.
By navigating through these technical intricacies during the setup of your new server, you lay the groundwork for a hosting environment finely tuned for optimal WordPress performance, security, and scalability.
Step-by-Step Guide For a Simplified WordPress Migration
Plugins streamline the migration process, making it accessible to users with varying technical expertise. They typically offer an intuitive user interface, simplifying the migration steps for beginners. Automation features within plugins facilitate a smoother transfer of site data from the old server to the new one. Here’s an insightful guide on the steps involved in exporting and importing data using a migration plugin:
Exporting Data from the Old Server
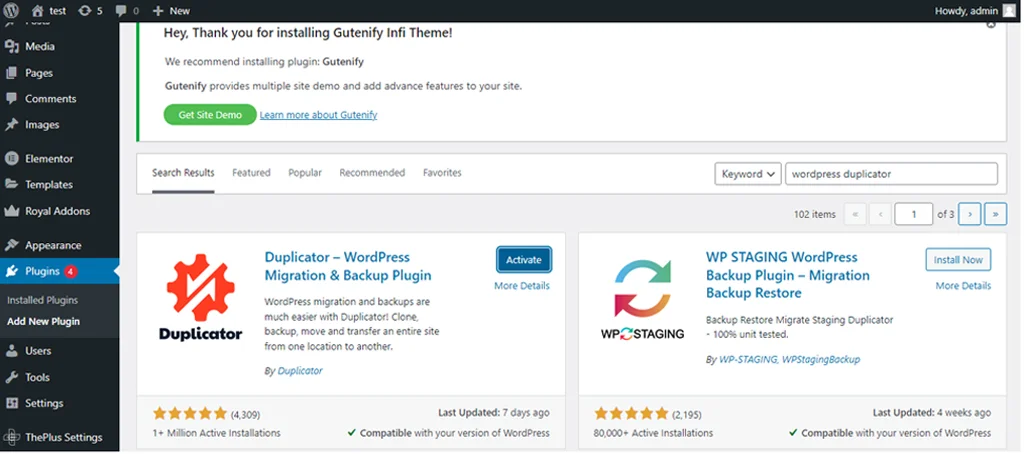
- Accessing the Migration Plugin: Navigate to the WordPress dashboard and access the migration plugin. This initial step sets the stage for a controlled and efficient export process.
- Initiating the Export Process: Within the plugin interface, initiate the export process with a discerning eye on precision. Select the specific data components to transfer, encompassing content, media files, themes, and plugins. This selective approach ensures a tailored migration aligned with your site’s unique structure and functionalities.
- Securing the Exported Data: Safeguard the exported data as if it were a digital artifact of utmost importance. Store it in a secure location, ensuring data integrity and readiness for the subsequent import process. This meticulous step serves as a safety net, allowing for seamless recovery in case of unforeseen challenges during the migration.
Importing Data to the New Server
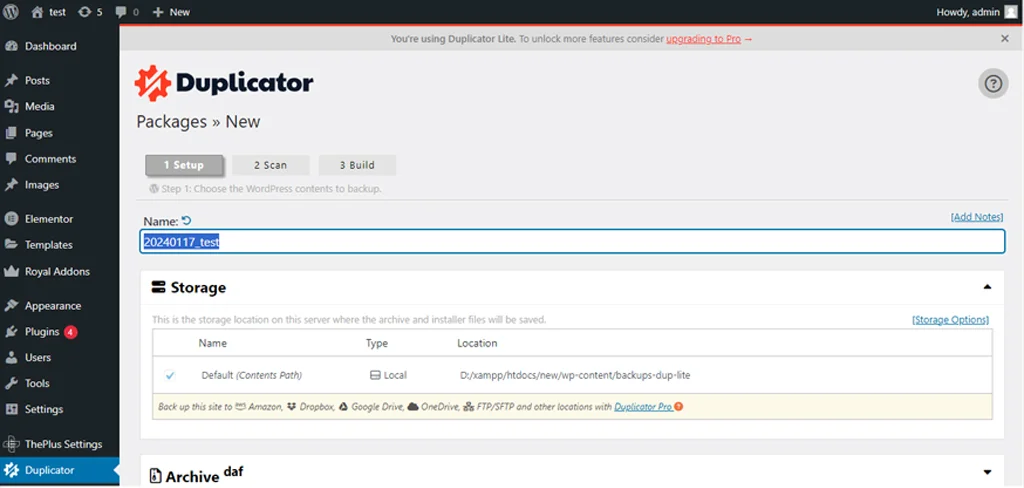
- Installing and Activating the Migration Plugin: Transitioning to the new server involves installing the migration plugin and activating it. This strategic move lays the groundwork for a harmonious integration of your WordPress data into the fresh hosting environment.
- Navigating to the Import Section: Within the plugin interface on the new server, navigate to the designated import section. This deliberate action ensures a focused and streamlined approach to the subsequent data upload and import process.
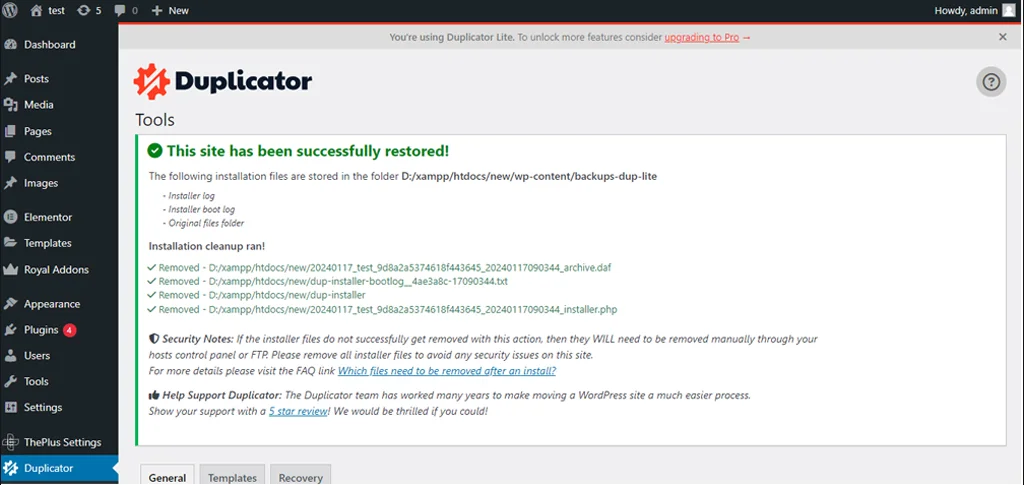
- Seamless Data Upload and Import: Upload the meticulously exported data from the secure location to the new server environment. Let the migration plugin sets up a seamless import, effortlessly integrating the data components into their designated spaces. This automated process minimizes the risk of data corruption or disruption, providing a foundation for continuity on the new server.
Troubleshooting Common Migration Issues
- Validate Exported Data: Rigorously validate the integrity of the exported data by cross-referencing it with previously created backups. This meticulous comparison serves as a verification mechanism, ensuring that the exported data accurately reflects the content and structure of the original site.
- Secure Data Transfer: In the event of discrepancies, initiate a re-export of the data, paying careful attention to the transfer process. Confirm that the data is securely transferred to the new server, minimizing the risk of corruption or loss during the migration.
- Ensure Plugin and Theme Compatibility: Mitigate compatibility issues by ensuring that plugins and themes are compatible with the WordPress version running on the new server. This proactive step prevents potential functionality issues that may arise due to incompatible elements.
- Update or Replace Incompatible Elements: Address compatibility hurdles by either updating the plugins and themes to versions compatible with the new WordPress version or replacing them with alternatives that seamlessly integrate with the chosen server environment. This strategic approach guarantees a harmonious coexistence of elements within the WordPress ecosystem.
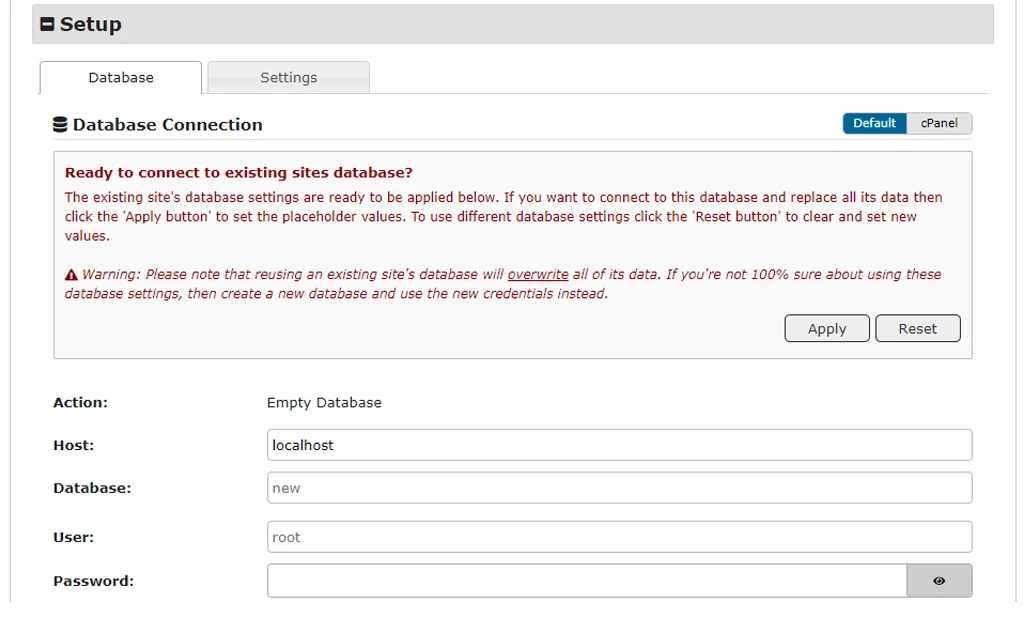
- Verify Database Settings: Scrutinize the database settings on the new server to ensure compatibility with the exported data. Confirm that the database configurations align with the requirements of the migrated WordPress site, mitigating the risk of data discrepancies.
- Adjust Database Configurations: In cases where inconsistencies arise, proactively adjust the database configurations on the new server. Fine-tune settings to create a seamless match with the exported data, ensuring optimal performance and functionality post-migration.
Updating DNS Records
DNS, or Domain Name System, guides online traffic to the correct server. Understanding its role is foundational to comprehending the significance of DNS record updates during migration. It translates human-readable domain names into IP addresses that servers can understand. This resolution process ensures that when users enter your domain, they are directed to the appropriate server hosting your WordPress site.
- Nameserver Update Protocol: Updating nameservers involves modifying the settings at your domain registrar. Navigate to the domain settings and replace the existing nameservers with those provided by the new hosting provider.
- Adjusting DNS Records: Alternatively, if using custom DNS records, update the A (Address) or CNAME (Canonical Name) records to point to the IP address of the new server. This step establishes the connection between your domain and the specific server hosting your WordPress site.
- Propagation Mechanism: DNS propagation is the time it takes for the updated information to propagate across DNS servers worldwide. During this period, users may experience intermittent access issues as the new DNS information is disseminated.
- Variable Propagation Duration: The duration of DNS propagation varies and can range from a few hours to up to 48 hours. Factors such as TTL (Time-to-Live) settings, individual DNS server policies, and geographical location contribute to this variability.
- Mitigating Downtime Impact: To mitigate potential downtime, it’s advisable to update DNS records during periods of lower traffic. Additionally, configuring a low TTL before migration reduces propagation time, allowing for a quicker and more controlled transition.
Testing for Zero Downtime for Seamless Transition
- Server Infrastructure Assessment: Initiate testing by conducting a comprehensive assessment of the new server’s infrastructure. Scrutinize server specifications, performance metrics, and configuration settings to ensure they align with the requirements of your WordPress site.
- Load and Stress Testing: Subject the new server to load and stress testing scenarios to evaluate its resilience under varying levels of traffic. This step is crucial for identifying potential bottlenecks and ensuring the server can handle peak usage without degradation in performance.
- Functional Testing of Core Features: Execute systematic functional tests on core WordPress features, including content display, navigation, user authentication, and form submissions. Verify that these fundamental functionalities operate seamlessly on the new server environment.
- Plugin and Theme Compatibility: Validate the compatibility of plugins and themes with the updated server configuration. Ensure that all essential functionalities provided by plugins and themes remain intact and do not introduce any issues post-migration.
- Identification of Anomalies: Employ meticulous monitoring tools to identify any anomalies or performance irregularities during the testing phase. Proactively detect issues related to server responsiveness, database queries, or resource utilization.
- Troubleshooting and Remediation: Address identified issues promptly through troubleshooting and remediation processes. This may involve adjusting server configurations, updating plugins or themes, or fine-tuning database settings to rectify any discrepancies.
- Incremental Testing: Conduct incremental testing after addressing issues to ensure that each adjustment contributes to the overall stability and functionality of the WordPress site on the new server.
Finalizing the Migration
- Initiate proactive communication with stakeholders, including team members, clients, or users, to apprise them of the impending migration. Convey the timeline, expected duration, and potential impact on services during the transition.
- Establish transparent channels for support and communication throughout the migration process. Ensure that stakeholders have access to relevant resources, support documentation, or contact points in case of queries or concerns.
- Schedule the final switch to the new server during a period of anticipated low traffic or minimal user engagement. This strategic timing minimizes the potential impact on users and ensures a smoother transition.
- Confirm that DNS records have been successfully updated and propagated across the network. Verify that the domain now resolves to the IP address of the new server, ensuring users are directed to the correct location.
- Ensure that all data, including databases, media files, and configurations, has been successfully migrated to the new server. Validate data integrity to avoid any discrepancies that may arise post-migration.
- Implement real-time monitoring tools to track the performance of the WordPress site on the new server. Monitor key metrics such as server response times, error rates, and resource utilization to promptly detect any abnormalities.
- Conduct a thorough assessment of the user experience on the live site. Navigate through different pages, interact with forms, and validate that all critical functionalities are operational. This user-centric approach ensures that the site meets expectations post-migration.
- In the event of post-migration issues, promptly identify the root causes through detailed analysis and troubleshooting. Engage in efficient issue resolution, which may involve adjusting server configurations, addressing plugin conflicts, or fine-tuning performance parameters.
Post-Migration Optimization
In the aftermath of a WordPress migration, the focus shifts to post-migration optimization, a phase where fine-tuning and refining the performance on the new server becomes paramount.
Implement Performance Optimizations on the New Server:
- Dive into the server configurations, meticulously assessing settings for web servers (e.g., Apache, Nginx), PHP, and database management systems (e.g., MySQL, MariaDB). Tweak parameters such as caching mechanisms, compression, and resource allocations to optimize overall performance.
- Integrate a Content Delivery Network (CDN) to enhance content distribution globally. Leverage the geographical reach of CDN servers to reduce latency, accelerate page load times, and provide a seamless experience for users across different regions.
- Explore load balancing strategies, distributing incoming traffic across multiple servers. This approach ensures optimal resource utilization and prevents server overload during traffic spikes, contributing to consistent performance.
Clear Cache and Ensure the Site Runs Smoothly:
- Establish a systematic protocol for clearing and updating caches, including browser caches, server-side caches, and any content delivery network caches. Regular cache clearing prevents outdated content delivery and maintains the responsiveness of the site.
- Verify that the site runs smoothly across various web browsers and devices. Address any compatibility issues promptly, ensuring a consistent and satisfactory user experience regardless of the platform used to access the site.
- Conduct iterative functional testing to validate the smooth operation of all website features. Ensure that forms, navigation, and interactive elements function as intended, identifying and resolving any anomalies that may have emerged post-migration.
Monitor Server Performance Over Time:
- Implement continuous monitoring of key performance metrics over an extended period. This includes tracking server response times, resource utilization, and overall system health. Regularly review performance data to identify trends and potential issues before they impact user experience.
- Assess the scalability of the server environment in response to changing demands. Regularly evaluate traffic patterns, resource consumption, and server response under varying loads. This proactive approach ensures that the server infrastructure remains robust and adaptable to evolving requirements.
- Conduct regular security audits, examining the server’s vulnerability landscape. Apply necessary updates to server software, plugins, and themes to fortify the site against emerging security threats. This ongoing vigilance contributes to a secure and resilient online presence.
Want to Switch from WordPress.com to a Self-Hosted WordPress Setup? Here’s How:
WordPress.com provides a hosted version of WordPress with restricted control and themes. While it’s free, there are paid add-ons available. Transitioning from WordPress.com to self-hosted WordPress provides an abundance of flexibility including the freedom to build your email list, install fantastic plugins, and explore a myriad of other possibilities. Check out how you can easily switch:
# Secure your hosting and domain
Your website needs a place to reside (host) and an easy-to-remember address (domain). Say goodbye to ‘yourblog.wordpress.com’ and hello to ‘yourblog.com’. Choose a hosting provider like SiteGround—it’s hassle-free to set up, and they even offer a quick WordPress installation with a helpful video guide. The only cost involved is for hosting and your domain name.
# Export your WordPress.com content
Simply log in to your WordPress.com Dashboard, head to WP-Admin under Tools, and choose Export. Opt for “All content” and hit the download button. Your content is now securely saved to your computer.
# Import your content to your new site
Login to your new WordPress site’s Dashboard, navigate to Tools, click Import, and select WordPress. Upload the exported XML file, click “upload file and import,” and ensure to check “Download and import file attachments” for copying over images. WordPress will handle the upload, and your content will be seamlessly imported to the new site.
# Apply a fresh theme to your website
The last step is selecting an attractive WordPress theme, installing it on your site, and relishing your new website—with the complete control you’ve acquired.
End Note
As you navigate the complexities of server transitions, consider the invaluable support that expert assistance can bring to the table. Our seasoned professionals specialize in seamless WordPress migrations, ensuring a hassle-free and optimized transition to your new hosting environment. Our dedicated team is here to guide you through every step, providing expertise, reliability, and a commitment to ensuring your WordPress site thrives in its new hosting environment. Contact us today for expert WordPress migration services.
Table of Content