
Your website can be hacked in less than one hour! Yes, you read it right!
WordPress is undoubtedly a testament to its user-friendly interface having a vibrant developer community that drives constant improvements. The popularity of WordPress fuels constant improvement, thanks to its vast developer community. However, this very popularity paints a bullseye on WordPress, making it an attractive target for hackers and malicious actors seeking vulnerabilities to exploit. The good news is, you can boost your WordPress security, even if you’re not tech-savvy.
Let’s check the 9-step WordPress security guide, that protects your website from vulnerabilities!
#1 Stay up-to-date - Regular Updates
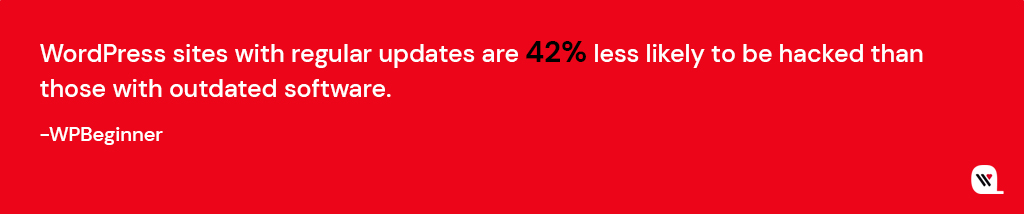
Updating your WordPress core, themes, and plugins might seem routine, but it’s your first line of defense against potential security threats. Software updates aren’t just about adding new features; they often include vital security patches that shield your website from vulnerabilities.
Cybercriminals actively seek websites running on older versions because they exploit known vulnerabilities. Regular updates ensure your site is equipped with the latest security protocols, protecting it from potential breaches and data theft.
Here is how you update WordPress Components:
Updating WordPress Core:
- Log in to your WordPress dashboard.
- Click on the ‘Dashboard’ option in the left menu.
- If an update is available, you’ll see a notification at the top. Click ‘Update Now.’
Updating WordPress Themes:
- Navigate to ‘Appearance’ in the left menu.
- Click on ‘Themes.’
- If an update is available, you’ll see an ‘Update Now’ option. Click it to install the latest version.
Plugins:
- Go to ‘Plugins’ in the left menu.
- You’ll see a notification next to plugins with available updates. Click on ‘Update Now’ next to each plugin.
Before updating, always back up your website. Use reliable backup plugins to create a full backup of your files and database. After updating, thoroughly check your website’s functionality. Sometimes, updates can conflict with other plugins or themes, causing unexpected issues. You can also automatically enable updates for plugins and themes using the following lines to your site’s wp-config.php file.
For plugins: define( ‘WP_AUTO_UPDATE_PLUGINS’, true );
For themes: define( ‘WP_AUTO_UPDATE_THEMES’, true );
#2 Make it Impermeable - Strong Password Policy
Creating strong passwords is the first line of defense against unauthorized access. Weak passwords are easy targets for hackers. A strong password should be complex, with a mix of uppercase and lowercase letters, numbers, and symbols. Avoid using easily guessable information like birthdays or common words.

Check out these tips on Creating and Managing Complex Passwords:
Length and Complexity: Aim for passwords that are at least 12 characters long and include a mix of letters (both cases), numbers, and special characters.
Avoid Personal Information: Refrain from using personal details such as names, birthdays, or addresses in passwords.
Unique for Each Account: Use different passwords for different accounts. Reusing passwords across platforms increases vulnerability.
Passphrases: Consider using passphrases – longer phrases or sentences that are easy for you to remember but difficult for others to guess.
Password manager tools are invaluable in managing complex passwords. They generate, store, and autofill strong, unique passwords for each of your accounts. Some popular password managers include LastPass, 1Password, and Dashlane. These tools encrypt your password database with a master password, ensuring your credentials are securely stored.
Implementing these practices significantly enhances your WordPress security, ensuring robust protection against unauthorized access attempts. Remember, a strong password is your website’s first line of defense.
#3 Add an Extra Security Layer - Two-Factor Authentication
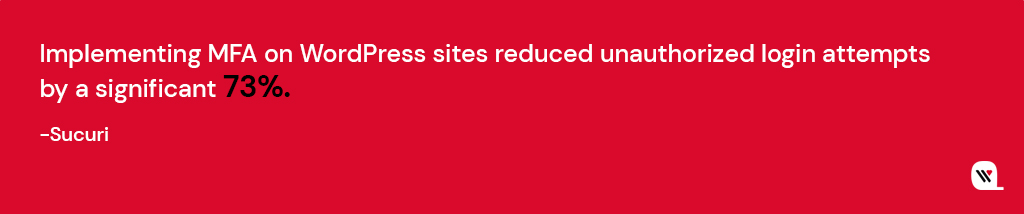
Two-factor authentication (2FA) requires users to provide two distinct forms of verification before accessing an account. Typically, this involves something you know (password) and something you have (a unique code sent to your mobile device or email). This dual-verification process ensures that even if a hacker discovers your password, they still cannot breach your account without the second form of authentication.
How to Enable 2FA in WordPress:
Choose a 2FA Plugin: Select a reputable 2FA plugin compatible with WordPress, such as Google Authenticator or Authy.
Install and Activate the Plugin: Install your chosen 2FA plugin from the WordPress repository. Once activated, the plugin integrates with your login system.
Configuration: Access the plugin’s settings and follow the configuration wizard. Typically, you’ll scan a QR code with a 2FA app on your mobile device, linking the app to your WordPress account.
Verification Codes: After setup, each time you log in, the 2FA app generates a time-sensitive verification code. Enter this code along with your password to access your account.
Benefits of 2FA in Website Security:
2FA adds an extra layer of defense, significantly reducing the risk of unauthorized access, even if passwords are compromised.
Even if a user falls victim to a phishing attack and reveals their password, the hacker would still need the secondary 2FA code to access the account.
- Particularly valuable for businesses, 2FA ensures secure logins from remote locations, safeguarding sensitive corporate data.
#4 Techniques to Prevent Unauthorized Access - Login Page Security
Ensure only authorized users can access your website’s backend. Stay proactive in these security practices, and your website remains resilient against cyber threats.
By implementing the following technical techniques, you significantly enhance the security of your login page:
Access Your WordPress Dashboard: Log in and navigate to the ‘Settings’ menu.
Select ‘Security’ or ‘Login Security’: Depending on your security plugin, locate the section related to login security settings.
Set Login Attempt Limit: Specify a low number of login attempts (e.g., 3-5). After this limit, the user is temporarily locked out, preventing further attempts for a defined period.
Customizing Login URL and Why It’s Important: Changing the default login URL from ‘/wp-admin/’ to a custom URL adds a layer of obscurity, making it harder for hackers to locate your login page. Here’s how to do it:
Install a Security Plugin: Use a reputable security plugin like WPS Hide Login or iThemes Security.
Configure Custom Login URL: In the plugin settings, locate the option for customizing the login URL. Enter the new URL you wish to use, ensuring it’s unique and not easily guessable.
Best Plugins for Login Page Security: Several plugins specialize in fortifying login page security, offering features beyond customization and login attempt limitations. Some top choices include:
iThemes Security: This comprehensive security plugin provides features like brute force protection, 2FA integration, and advanced user action logging.
Wordfence Security: Wordfence includes firewall protection, real-time threat defense, and login attempt monitoring, making it a robust choice for safeguarding your login page.
WPS Hide Login: Specifically designed to change your login page URL, this lightweight plugin ensures your login page is concealed from potential attackers.
#5 Data Protection in Case of a Security Breach - Regular Backups
Backups are essential not only for security breaches but also in cases of accidental data loss, server failures, or updates gone wrong. Moreover, regular backups, combined with a seamless restoration process, offer you peace of mind, knowing your data is secure and recoverable in the event of a security breach or any unforeseen circumstances.

How to Set Up Automatic Backups:
-
Choose a Backup Plugin: Select a reputable WordPress backup plugin such as UpdraftPlus, BackWPup, or VaultPress. Install and activate your chosen plugin.
-
Configure Backup Settings: Access the plugin settings from your WordPress dashboard. Specify the backup frequency (daily, weekly), and choose a secure off-site storage location, like Dropbox, Google Drive, or a dedicated server.
-
Database and Full Site Backups: Configure the plugin to perform both database and full site backups. Database backups capture essential data, while full site backups include all files, ensuring comprehensive coverage.
-
Schedule Automated Backups: Set up automated backup schedules aligned with your website’s update frequency. Daily backups are advisable for active websites with frequent content changes.
Restoring Your Website from a Backup:
Access Backup Plugin: In your WordPress dashboard, go to the backup plugin you installed.
Select the Backup File: Choose the backup file from the designated storage location. If your backup plugin offers versioning, select the appropriate date/version you want to restore.
Initiate the Restoration: Follow the plugin’s prompts to initiate the restoration process. Confirm settings, and the plugin will restore your site to the selected backup point.
Verify Website Functionality: After restoration, thoroughly test your website’s functionality. Ensure all pages, posts, images, and interactive elements are functioning correctly.
#6 Protect Against Brute Force Attacks - Implement CAPTCHA
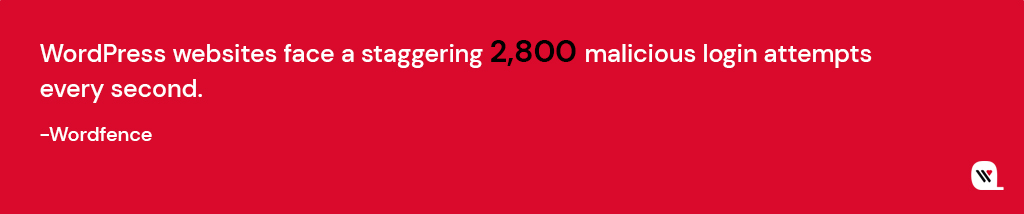
Brute force attacks, a common threat to website security, involve automated attempts to crack passwords systematically. Automated bots systematically test different passwords, exploiting weak credentials.

Such attacks can compromise your website’s integrity and sensitive data. To safeguard your WordPress site against such attacks, employ these technical strategies:
Plugins and Tools to Safeguard Against Brute Force:
-
Security Plugins: Utilize reliable security plugins like Wordfence Security and Sucuri Security. These tools offer features like limiting login attempts, IP blocking, and CAPTCHA integration, bolstering your site’s defenses.
-
CAPTCHA and reCAPTCHA: Integrate CAPTCHA challenges or advanced reCAPTCHA from Google on your login page. These tests differentiate between humans and bots, preventing automated login attempts.
-
IP Whitelisting and Blacklisting: Whitelist trusted IP addresses, allowing only authorized users to access your login page. Simultaneously, blacklist suspicious IP addresses, thwarting potential attackers.
Monitoring and Responding to Suspicious Login Attempts:
-
Real-Time Monitoring: Leverage security plugins to monitor login attempts in real-time. Track IP addresses, login patterns, and failed login counts. Unusual activities might indicate a brute force attack.
-
Email Alerts: Configure your security plugin to send email notifications for multiple failed login attempts. Immediate alerts enable swift responses to potential threats.
-
Automatic IP Blocking: Implement automatic IP blocking for repeated failed login attempts. Temporary blocks discourage attackers, protecting your site without manual intervention.
#7 Limiting Access to Your Website Files - File Permission Security
Understanding and correctly configuring these permissions is essential to prevent unauthorized access and maintain the integrity of your website files. Properly configured permissions ensure that only authorized entities can modify or access crucial files, enhancing the overall security posture of your WordPress website.

Setting Correct File and Folder Permissions:
-
Access Control: Use the principle of least privilege. Only grant permissions necessary for each user category. For instance, files should typically have permissions set to 644 (rw-r–r–) and directories to 755 (rwxr-xr-x).
-
Secure Config Files: Critical configuration files like wp-config.php should have permissions set to 400 (r——–), ensuring only the owner (usually the web server) can read them.
-
Avoid 777 Permissions: Never set files or directories to 777 (rwxrwxrwx), which grants universal read, write, and execute permissions. Such openness invites exploitation.
Common Mistakes to Avoid:
-
Overly Permissive Settings: Avoid granting unnecessary write or execute permissions. Limit permissions to prevent unwanted modifications.
-
Ignoring Ownership: Be aware of file ownership. Ensure the appropriate user or group owns files, usually the web server user (e.g., www-data on Apache).
-
Failing to Update Permissions: Regularly review and update permissions, especially after installing plugins or making significant changes to your website.
#8 Data Transmission Encryption - HTTPs and SSL Certificates
HTTPS (Hypertext Transfer Protocol Secure) and SSL (Secure Sockets Layer) certificates are fundamental components of web security. HTTPS encrypts data transmitted between a user’s browser and the website server, ensuring that sensitive information remains confidential. SSL certificates validate the authenticity of websites, confirming to users that they are interacting with a genuine and secure platform.

How to Install and Configure SSL on WordPress:
-
Obtain an SSL Certificate: Purchase an SSL certificate from a trusted Certificate Authority (CA) or use a reliable hosting provider that offers free SSL certificates (e.g., Let’s Encrypt).
-
Install SSL Certificate: Follow your hosting provider’s instructions to install the SSL certificate. This may involve generating a Certificate Signing Request (CSR) and providing it to the CA.
-
Update WordPress Address and Site Address: In your WordPress dashboard, go to ‘Settings’ > ‘General.’ Update both the ‘WordPress Address (URL)’ and ‘Site Address (URL)’ to begin with ‘https://’ instead of ‘http://.’
-
Update .htaccess File: Insert code in your .htaccess file to redirect all traffic to the secure HTTPS version of your site. Example code:
RewriteEngine On
RewriteCond %{HTTPS} off
RewriteRule ^ https://%{HTTP_HOST}%{REQUEST_URI} [L,R=301]
Mixed Content Issues: Check for mixed content issues (HTTP content loading on HTTPS pages) and update URLs to HTTPS to ensure a fully secure browsing experience.
Implementing HTTPS through SSL certificates not only enhances your website’s security but also augments its credibility, user trust, and search engine ranking.
#9 Beware of DDoS Attacks - Confine XML-RPC functionality
Disabling XML-RPC when it’s not needed eliminates a potential security risk and reduces the attack surface of your WordPress site. It is commonly targeted for Distributed Denial of Service (DDoS) attacks and brute force amplification. If your website doesn’t rely on XML-RPC functionalities, such as pingbacks and trackbacks, it’s advisable to disable it to enhance your site’s security.

How to Disable XML-RPC:
Using a Security Plugin:
-
Install a reputable security plugin like Wordfence Security or iThemes Security from the WordPress repository.
-
Access the plugin settings and look for options related to XML-RPC. Disable XML-RPC functionality through the plugin interface.
Editing .htaccess File:
-
Access your website’s root directory using an FTP client or cPanel File Manager.
-
Locate the .htaccess file and edit it (make sure to back up the file first).
-
Add the following code to disable XML-RPC:
# Block WordPress xmlrpc.php requests
<Files xmlrpc.php>
Order Deny,Allow
Deny from all
</Files>
Functions.php Method (Advanced Users):
- If you’re comfortable with the code, you can add the following snippet to your theme’s functions.php file to disable XML-RPC:
add_filter(‘xmlrpc_enabled’, ‘__return_false’);
These technical methods provide you with the means to secure your site by preventing unwanted access through XML-RPC and fortifying your overall security posture.
End Note
Remember, website security is not a one-time task but a continuous commitment. Don’t wait for a security breach to take action. Protect your website and your visitors’ data by investing in professional WordPress security services today. Our experts are here to help you fortify your digital fortress. Contact us now and safeguard your online presence against the relentless forces of the cyber world.